
Integrations is an Omnichannel Qontak feature that allows customers to connect various platforms to the chat panel.
Important
Only users with the Admin role can perform integrations. If you do not have an account with the Admin role, you can contact our support team at support-qontak@mekari.com.
To manage the Qontak Omnichannel integration with Live Chat on the Web, follow these steps:
A. How to Integrate Live Chat with a New Widget in Any Visitor Mode
The Any visitor feature allows Qontak to recognize website visitors through an OTP code sent to their email. To use it, you only need to install the same script tag on every website page. Visitors need to enter the OTP code for verification, but you do not need to perform any additional work on your end. This feature requires the exact same domain as the website address and is suitable for public websites, online stores, and help pages.
Follow these steps.
- In the Channel Integration menu, click “Manage” in the Live chat section.
- Select “Add widget”.
-
Next, enter the Widget name.
A name that is only visible to your team, with a maximum of 30 characters: letters, numbers, spaces, hyphens, and underscores.
- In the Choose an audience section, select Any visitor mode.
-
Then, in the Domain field, enter the website address where the widget will be displayed. Make sure you enter the complete website address, including https:// and www if used on your website. For example: https://www.example.com. Make sure the address entered matches the website address so that the widget can run on the specified domain.
Domain addresses that use www and those without www are considered two different domains. The same applies to each subdomain. Make sure you enter the domain address that visitors use to access the website.
If the domain address does not match, the chat button will display the error messages “This website is not registered for chat” and “Please contact the business another way.” The messages are accompanied by a Support code line ending in widget_invalid.
One widget can only be used for one Domain. - Then click “Add widget”.
- If the data you entered is correct, the following pop-up will appear, indicating that the data you entered has been created.
Next, you will be directed to the Widget setup page. On the Connection tab, in the Entry point section, select the visitor identification method to use: Email or Phone number. If you select Email, visitors must enter their email address and the OTP code sent to that address. If you select Phone number, visitors must enter their phone number and email address, then enter the OTP code sent to their email address to verify their identity.
- Then, copy the Embed code block.
- Paste the following code block immediately before the </body> tag on every page that displays the chat feature. The following is an example of the code block to add:
-
Open your website using the address that matches the configured Domain. The chat button will appear in the lower-right corner of the page. Click the button to display a form requesting an email address or phone number and email address, according to the Entry point settings.
- If the website is opened through localhost, a preview address, or another address that does not match the Domain configuration (for example, the Domain was registered without www, but the website is accessed using www), the chat button will display an error message.
- The code block in the console already contains your widget host and widget code. If you manually enter the tag , replace WIDGET_HOST with the widget host available in the Environment section and the address, then replace YOUR_WIDGET_CODE with your widget code.
B. How to Integrate Live Chat with a New Widget in Signed-in User Mode
Signed-in user mode allows customers who are already logged in to your application to use the widget without entering an OTP code. In this option, visitor identities are recognized through your application server. Use this mode if visitors are already logged in to your application. The server identifies visitors and sends their information to Qontak, so visitors do not need to enter an OTP code. This mode does not require Domain settings.
This option does not require special domain settings and is suitable for customer portals, dashboards, and applications that require customers to log in first.
To install this mode, you need assistance from a developer because the installation process involves configuration on the server side.
Follow these steps.
B1. Prepare Widget Information
- In the Channel Integration menu, click “Manage” in the Live chat section.
- Select “Add widget”.
- Next, enter the Widget name.
- In the Choose an audience section, select Signed-in users mode.
- Then click “Add widget”.
- If the data you entered is correct, the following pop-up will appear, indicating that the data you entered has been created.
- In the Credentials section, check the App name used to identify your application.
-
In the Credentials section, check the available Client ID and Secret key. Prepare both pieces of information for the developer to use when configuring the application.
The Secret key is displayed only once after it is created. Store this information securely and do not share it with unauthorized parties.
B2. Obtain an Access Token
In this step, the developer needs to obtain an access token used to authenticate requests to the Qontak Live Chat service. This request is made through your application server using the Client ID and Secret key available on the Connection tab. Follow these steps:
- Prepare the Client ID and Secret key from the Qontak Live Chat widget settings on the Connection tab.
- Save both pieces of information as environment variables on the server with the names QONTAK_CLIENT_ID and QONTAK_SECRET_KEY. This way, the credential values do not need to be written directly in the command.
-
Run the following command in the server terminal to request an access token:
The command sends the Client ID and Secret key to the Qontak authentication endpoint to obtain an access token.
Check the response received. If the request is successful, the response will contain information like the following:
Save the access_token value on the server. This token will be used to authenticate API requests in the next installation step.
B3. Register the Visitor as a Contact
After obtaining the access token, register your application visitor as a contact in Qontak. This process is performed through the application server by sending visitor data using the Qontak Web Chat API.
Follow these steps:
- Prepare the following information:
- App ID: The application ID used in the Qontak Live Chat widget.
- Access token: The authentication token obtained in the previous step.
- External ID: The unique visitor ID created and stored in your application system.
- Full name: The visitor’s full name.
- Run the following command through the server terminal to send visitor data to Qontak:
Replace YOUR_APP_ID with your widget’s App ID. Make sure the access token obtained in the previous step is used in the Authorization section. Then, adjust the external_id and full_name values to match the visitor’s data in your application.
Check the API response received. If registration is successful, the response will display a success status along with the registered contact information.
Response example:-
Save the data.id value from the API response. This value is the Contact ID that will be used in the next installation step.
- external_id is the visitor’s unique ID in your application system. Use the same ID for the same visitor so that the chat history remains connected to the appropriate contact.
- external_id and full_name are required.
- Use a randomly generated and difficult-to-guess external_id value. Avoid using the visitor’s account number, email address, phone number, or national identification number.
B4. Install the Script on the Application Page
After obtaining the access token and Contact ID from the previous steps, install the Qontak Web Chat script on your application page so that the widget can be displayed to visitors who are already logged in (signed-in users).
Follow these steps:
- Prepare the following information:
- Widget Host: The host used to access Qontak Web Chat.
- App ID: The application ID from the Qontak Web Chat widget.
- Access token: The authentication token obtained in step 2.
- Contact ID: The contact ID obtained in step 3.
- Add the following script to your application page code:
- Adjust the values in each of the following attributes:
- WIDGET_HOST: The Qontak Web Chat host being used.
- YOUR_APP_ID: Replace with your widget’s App ID.
- ACCESS_TOKEN_DARI_LANGKAH_2: Replace with the access token obtained in step 2.
- CONTACT_ID_DARI_LANGKAH_3: Replace with the Contact ID obtained in step 3.
- Make sure the application server generates the script for every visitor who is logged in. This ensures that each visitor is connected to their respective contact identity.
B5. Complete the Installation
After all configuration is complete, Qontak Live Chat is ready to use on your application page.
The chat button will appear automatically without the need to call additional JavaScript. Messages sent by visitors will also be recorded immediately using the name of the contact registered previously.
The browser does not store the chat session. Each page uses the access token and Contact ID sent through the attributes in the script.
C. How to Manage the Content and Appearance of the Live Chat Widget
- For the widget you want to manage, click “Action”, then click “Set up widget”.
- On the Widget setup page, you can configure the appearance of the widget on your website, including Connection, Topics, and Content & Appearance.
a. Connection
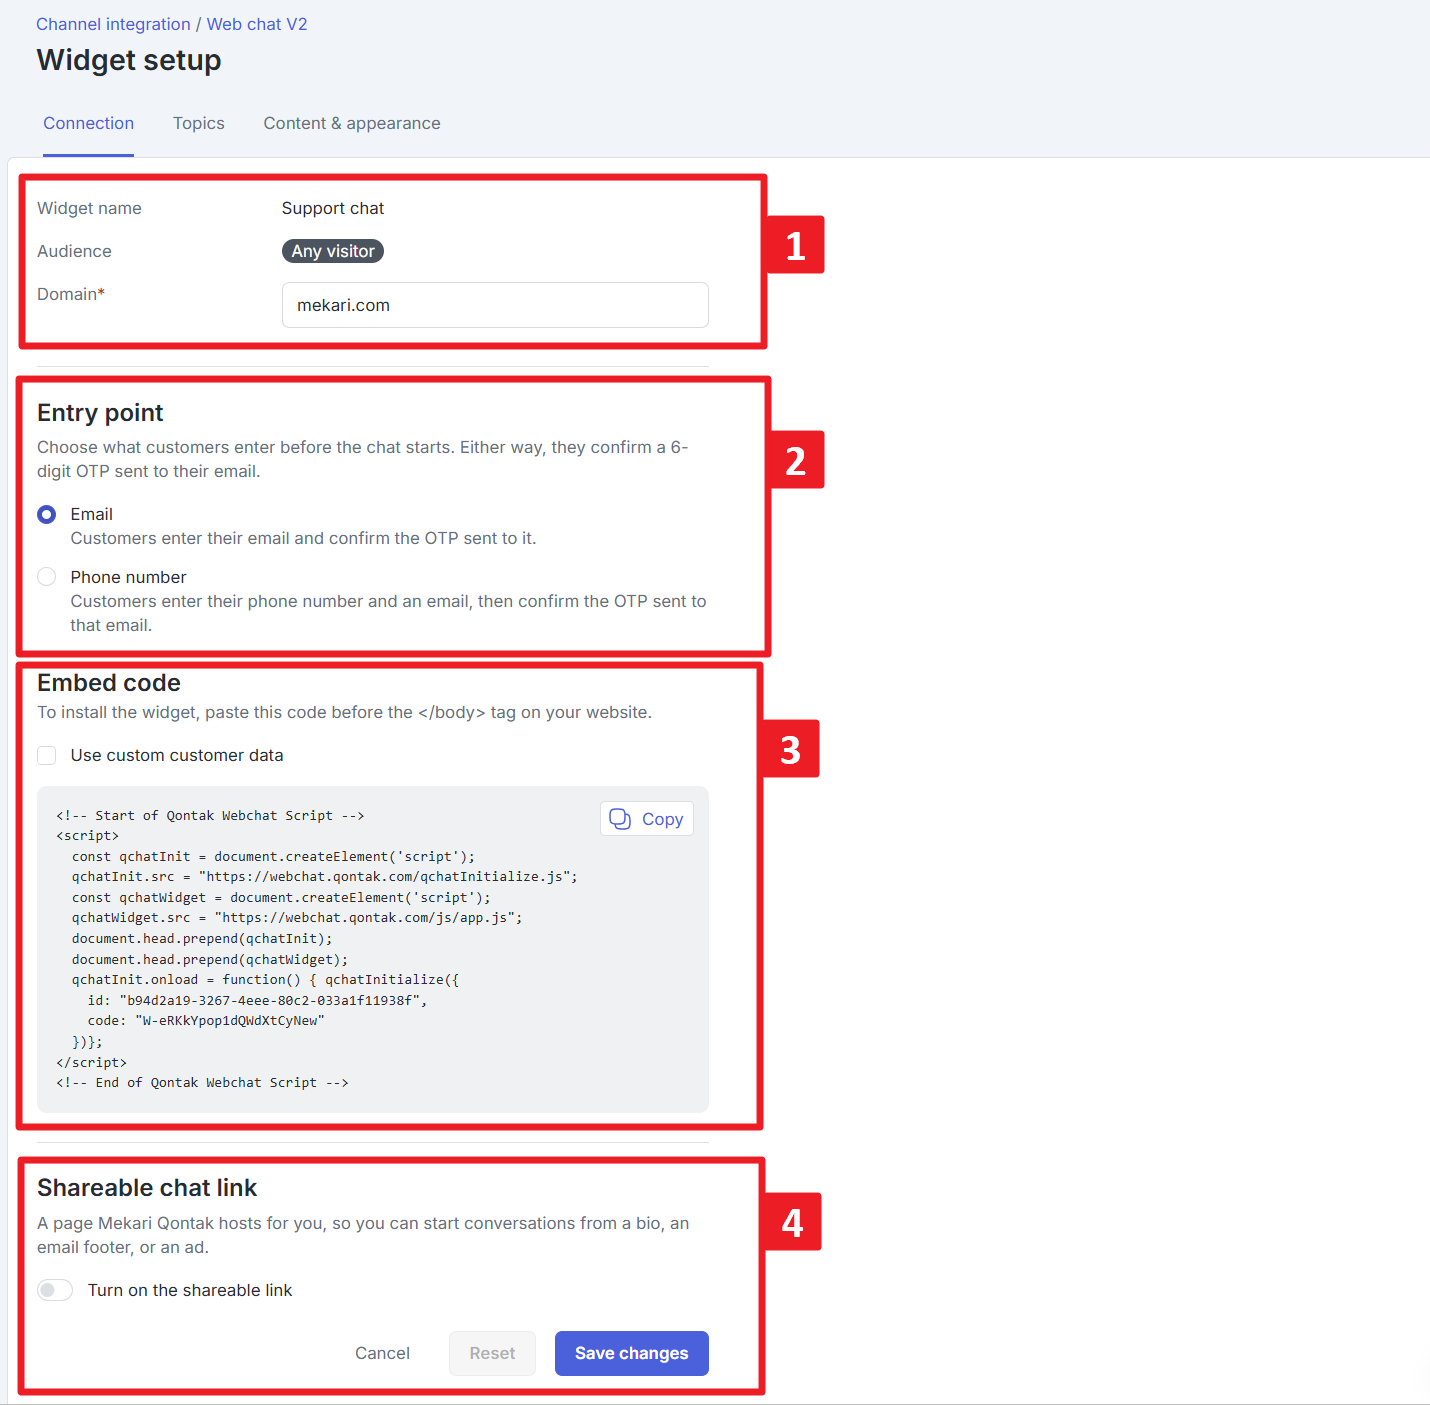
Details:
| No. | Feature Name | Description |
| 1 | Connection | Displays widget connection information, including Widget name, Audience, and Domain. Domain information is displayed if the selected audience is Any visitor. The Domain determines the website where the widget can be used. |
| 2 | Entry point | Determines the method customers use to start a chat. You can select Email, in which customers enter their email address and confirm the OTP code sent to that address. Or, Phone number, in which customers enter their phone number and email address, then confirm the OTP code sent to the email address. |
| 3 | Embed code | Provides the script code that must be added to the website to install the widget. Copy the code using the Copy button, then paste it before the tag </body> on your website. You can also enable Use custom customer data to use custom customer data. |
| 4 | Shareable chat link | Allows you to enable a chat link hosted by Mekari Qontak. Customers can use this link to start a conversation, for example, through a social media bio, email footer, or advertisement. Enable “Turn on the shareable link” to activate the link. Learn more here. |
Implementing the Shareable Chat Link
Important
This feature only applies to Any visitor mode.
Here is the implementation flow for the Shareable Chat Link when enabled:
- After enabling the “Shareable link” toggle, click “Copy” to copy the provided link.
- After completing the configuration, click “Save changes” to save the changes.
- Then open the link you copied earlier. The following screen will appear. Complete the data in each field.
- Then click “Send OTP” to continue.
- Enter the OTP code sent to your email. Then click “Verify”.
- Next, you will be directed to the following screen. In this example, the illustration used is a chat order.
- Next, try sending a message through Live Chat.
- After the customer sends a message, the conversation will automatically appear on the Mekari Qontak Inbox page and can be handled by an Agent.
b. Topics
On the Topics tab, you can configure conversation topics to help customers select their needs before starting a chat. The selected topic determines whether the conversation is forwarded to the appropriate agent or to WhatsApp. Follow these steps.
Click “Add topic” to add conversation topics that customers can select when opening a chat.
Then, complete the topic settings by entering the following information as needed.
Details:
| No. | Feature Name | Description |
| 1 | Icon | Determines the icon representing the conversation topic. |
| 2 | Topic name | Determines the topic name displayed to customers when selecting a topic before starting a chat. |
| 3 | Description | Adds a brief description of the conversation topic. This field is optional, and the description is not displayed on the widget. |
| 4 | Where conversations go |
Determines the conversation destination by selecting one of the following options:
|
Then click “Add topic”.
The topic you specified will appear on the following screen. Next, click “Save changes”.
c. Content & appearance
In Content & appearance, you can upload your logo and set the widget colors. The details are as follows.
Details:
| No. | Feature name | Description |
| 1 | Widget Content tab |
Used to configure the widget content based on conditions: Header, Online, Offline, and Greeting. The following is the Widget Content display. |
| 2 | Title on the ‘Header’ tab | Used to configure the title displayed on the widget according to the selected tab. |
| 3 | Widget Logo | Used to upload the logo displayed on the widget. The logo file must be in PNG format, 60 × 60 pixels, and a maximum of 500 KB. |
| 4 | Main Color | Used to configure the widget’s primary color, such as the header color and other main elements. |
| 5 | Agent Bubble Color and Customer Bubble Color | Used to configure the background color of the chat bubbles displayed on the widget for both Agent and customer messages. |
| 6 | Launcher and Session | Used to configure the logo and label display on the widget launcher through the Show logo on launcher and Show launcher label options. |
| 7 | Launcher Label | Used to configure the label text displayed on the widget launcher, such as “Chat with us”. |
| 8 | Session Length | Displays the duration of a visitor’s session on the website through the widget. If the session is more than 24 hours from the customer’s perspective, they must re-enter the email address or phone number used to verify their identity. This session duration setting is valid for 24 hours and cannot be changed. |
| 9 | Preview | Used to preview the widget display that customers will see on the website, including the chat, topics, and launcher. |
- Then click “Save changes”.
- After saving the Widget settings, you will return to the initial Live Chat Integration page. A notification like the following will also appear, indicating that the settings have been successfully saved.
D. How to Delete a Widget in Live Chat
Important
If you delete the widget, make sure you also delete the script of the widget previously added to the website so that the widget no longer runs on that website.
- For the widget you want to delete, click “Action”, then click “Delete”.
- In the pop-up that appears, click “Delete”.
- You will return to the initial Live Chat Integration page. A notification like the following will also appear, indicating that the Widget has been successfully deleted.
This concludes the guide on managing Live Chat integrations in Mekari Qontak.