
Qontak Appointments is a scheduling feature used to receive and manage reservations or appointments. You can specify operational locations (Locations), services offered (Services), as well as the staff responsible for providing those services (Staff). Once all settings are completed, you, your team, or the integrated AI booking agent can schedule reservations, while the entire daily schedule can be monitored and managed through a single timeline view.
A. Menus in Qontak Appointment
| No. | Menu Name | Description |
1 |
Schedule | Monitor and manage all appointment schedules in a timeline view. On this page, users can see a booking summary, filter schedules by date, location, and staff, as well as monitor availability and appointment status for each staff member. |
2 |
Bookings | Displays a list of all bookings made in a table format, complete with customer information, services, staff, appointment schedules, booking sources, and booking status. |
3 |
Locations | The physical locations where appointments take place. Locations include information such as address, time zone, operating hours, and days when the location is closed. |
4 |
Services | Services offered to customers, such as general consultation, haircut, tooth extraction. Each service has a duration set in 5-minute increments and can have buffer time before or after the service, a list of locations where the service is available, as well as a list of staff qualified to provide the service. |
5 |
Staff | Team members responsible for providing services to customers. Each staff member has a role, primary location, weekly work schedule, and a list of services they can handle. Staff can be associated with more than one service or location. |
B. Roles That Can Access Qontak Appointment
There are two user roles that can access this feature:
Admin & Supervisor:
Have full access to all features. Users with this role can manage Locations, Services, Staff, time-off schedules, operational closed days, perform all booking-related activities, and view the entire activity history (audit log).
Agent
Only has access to perform booking operations. Users with this role can create, modify, reschedule, reassign staff, cancel, complete, or mark bookings as no-show. The settings page (master data) is not accessible to Agents.
C. How to Access the Qontak Appointment Page
For users still using the old Mekari Qontak dashboard, access to the Appointment page can be done via appointment.qontak.com. Before accessing this page, make sure your account has permission (access) to the CRM feature.
- Log in to your Qontak account. Then select the “Home” menu.
- On the next page, click on the Qontak Labs section.
- You will be directed to the following page. Click “Explore Features” under Qontak Appointment.
- You will then be directed to the main page of Qontak Appointment.
D. Overview of the Schedule Page
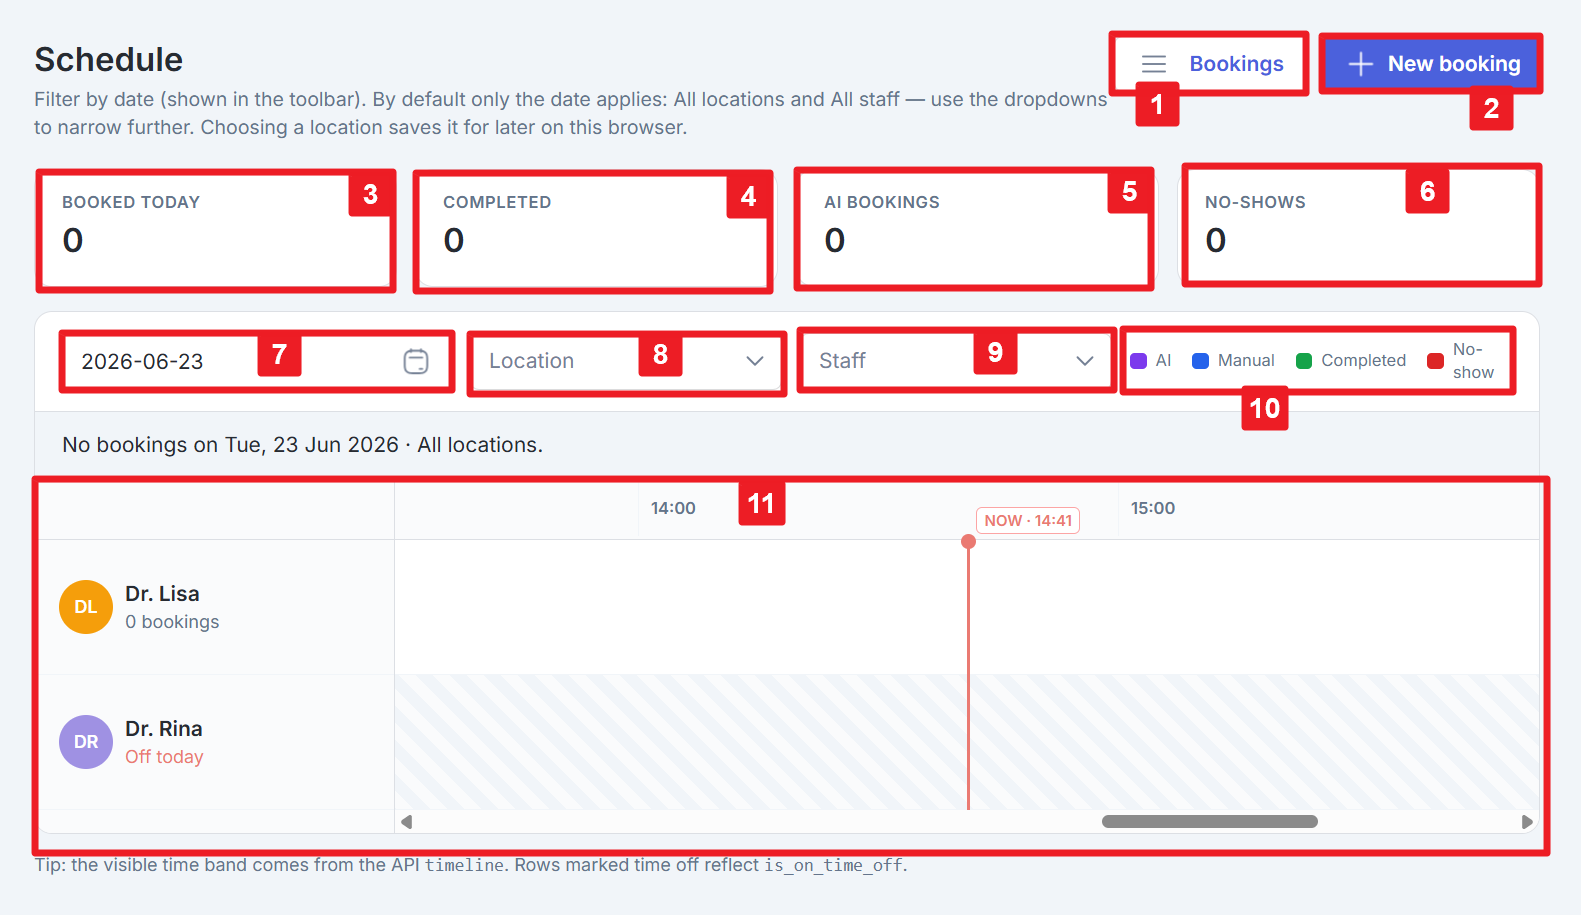
| No. | Feature Name | Description |
| 1 | Bookings | Button to open the All Bookings page, which displays all booking data in a table format. |
| 2 | New booking | Button to create a new booking or appointment manually. |
| 3 | Booked Today | Displays the number of bookings scheduled for the selected day. |
| 4 | Completed | Displays the number of bookings that have been completed on the selected day. |
| 5 | AI Bookings | Displays the number of bookings made through the AI Booking Agent on the selected day. |
| 6 | No-Shows | Displays the number of bookings with the status No-show, meaning the customer did not show up as scheduled. |
| 7 | Date Filter | Used to select the date to be displayed on the Schedule timeline. |
| 8 | Location Filter | Used to filter the schedule display based on a specific location. |
| 9 | Staff Filter | Used to filter the schedule display based on specific staff. |
| 10 | Booking Status | Displays the color legend used on the timeline to differentiate booking status or sources, such as AI, Manual, Completed, and No-show. |
| 11 | Schedule Timeline |
Displays the appointment schedule in a timeline format based on the selected date, location, and staff. This timeline also shows staff working hours, bookings, as well as staff time off or absences. Staff time off or absences are displayed as special blocks with the reason for the time off or absence included. |
E. Booking Status
Locations, Services, and Staff each have an Active or Inactive status.
- Items with Active status will be displayed and can be selected when making a booking.
- Items with Inactive status remain saved in the list but will not be displayed during the booking process.
The Inactive status can be used to temporarily disable services or staff without deleting the data.
F. Configuration Steps in Qontak Appointment
The configuration process in Appointments follows a specific order because each setting depends on the others. Therefore, make sure you set up in the following sequence:
- Start by creating Locations first.
Next, add Services and link those services to one or more Locations.
Then, add Staff, set their working hours, and specify at least one Service that the staff can handle.
Important
Bookable time slots will only be available if Locations, Services, and Staff have been configured. Additionally, the selected staff must be qualified to provide the service, be within working hours, and not have another appointment at the same time. If the time slot does not appear, it is usually due to one of the above configurations not being fulfilled.
That is an overview of Qontak Appointment. Learn more here about how to configure Qontak Appointment.